If your hair clippers aren’t performing as well as you’d expect, it may be time to sharpen them. After all, a hair clipper is simply an engine that drives two blades moving against each other, and those blades will inevitably grow blunt over time. In fact, even self-sharpening hair clippers may need some help to stay sharp.
Of course, hair clipper blades aren’t quite like most blades you encounter every day, and they’re not as easy to sharpen. In this article, I’m going to cover the tools you need to sharpen your clipper blades, a step-by-step breakdown of how to sharpen hair clippers, and some tips to keep in mind while you sharpen. Read on to find out how to sharpen hair clipper blades!
Table Of Contents
Basic Blade Maintenance Tips

Before I get to the actual process of sharpening, it’s important to note that reduced cutting performance is not necessarily a sign of blunt blades. It’s entirely possible that your blades may simply be dirty or insufficiently lubricated, so make sure that you’re keeping up a proper maintenance routine on your clipper:
You should be brushing your clippers to get loose debris off them. I recommend brushing as often as possible to keep the blades clear of hair. For more on brushing, check out my article on how to clean hair clippers.
You should also oil your blades every so often so that they maintain optimal performance. How often depends on your workload. If you’re cutting hair more than once a day, oil your clippers after every two cuts. If your workload is lighter, once a week is fine. For more on oiling, read my article about how to oil hair clippers.
How To Sharpen Hair Clippers
How do you know when your clippers need sharpening? Well, if it seems like cleaning isn’t enough to get your clipper cutting as it should, then it’s time to bring out your tools. In this section, I’ll lay out the necessary tools and show you how the sharpening process works.
Tools You Need
Here’s what you need to sharpen your clipper blades.

- A sharpening stone: Ideally, you should have a combination stone of 3000 grit on one side and 8000 grit on the other. You can also get more stones with more grits in between these two, but you can get by with just 3000 and 8000.
- A screwdriver: You’ll need to dismount your blade.
- A toothbrush: This will help clean stubborn debris off your blade, as it’s usually stiffer than a typical hair clipper brush.
- A marker: This will let you see how much of your blade you’ve removed in the process.
- A clean cloth and paper towels: Something to wipe down your blade with.
- Blade wash: Or your preferred blade cleaning solution.
Step 1: Unscrew The Blades
While most cleaning processes won’t need you to dismount the blade, sharpening does. Take your screwdriver to the screws holding the blade in place, then unscrew. Make sure to set the screws aside somewhere you won’t forget. If you have a clipper with easy-remove blades, you won’t even need the screwdriver.
Step 2: Clean The Blades
You can skip this step if you’ve already cleaned them recently. But you should never sharpen a blade while it’s dirty, because that just causes problems. Scrub the blades clean with a toothbrush and wipe them down afterward with a clean cloth.
Step 3: Remove Rust
Before sharpening, soak your blades in blade wash to remove rust. In case you don’t have any blade wash, white vinegar or alcohol will do. If you’re using alcohol, note that isopropyl alcohol won’t be enough. Get 90% alcohol, that’s strong enough to remove rust from your blades. Once soaked, dip a cotton ball into whichever solution you’ve just used and scrub your blades with it to remove any rust that’s still clinging.
Step 4: Mark Your Blade
This is where the marker comes in. Highlight the interior of both blades. The interior side is whichever side of the blade rests on the other while the clipper is running. This will help you track how much of the blade you’ve removed.
Step 5: Lubricate Your Stone
Never use a sharpening stone dry! Lubricate your sharpening stone with water or honing oil, depending on the stone you’re using. An oilstone takes oil, a waterstone or diamond stone takes water. If you have a waterstone, I recommend dunking it into a tupperware or similar container filled with enough water to cover your stone completely. Wetting your sharpening stone will prevent waste material from your blade from sticking to the stone, and thus maintain sharpening performance.
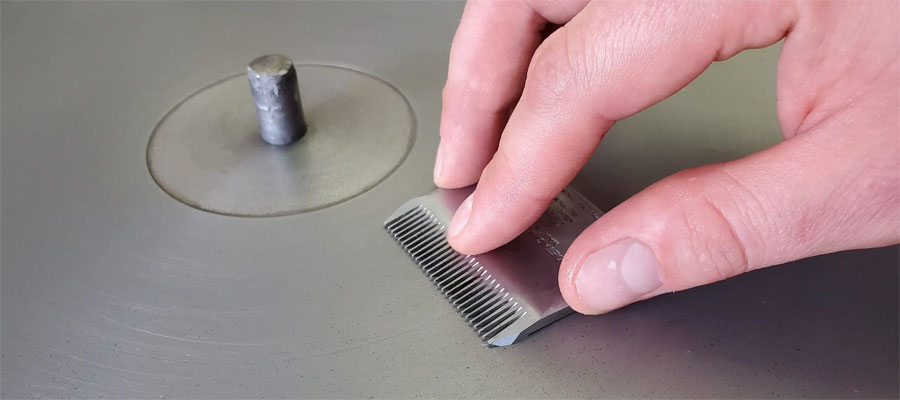
Step 6: Sharpen Coarse
Wet the coarse side first, because that’s where we start. Position the sharpening stone so that you face one of the two short edges. Lay your blade flat onto the stone, interior side down against the grit. Then push the blade back and forth along the stone, using gentle pressure. 10 to 15 strokes along the stone will do. A good guideline is to go until only a little of the marker is left. Do the same for the other blade.
Step 7: Clean And Wash
Once you’re done with the coarse side, give both the stone and the blade a wash and a wipe down. This will get rid of any waste material that may have stuck on the blade and on the stone. As we noted above, keeping your sharpening stone clear of waste material means that its sharpening performance won’t degrade and thus your process will go a lot smoother.
Step 8: Sharpen Fine
Turn your sharpening stone over to bring out the fine side. It’s the same process overall. Lubricate the stone, then take your blade to the stone. Again, short edge facing you, lay your blade flat, and push the blade back and forth for 10 to 15 strokes. If there’s still any marker left, keep going until it’s all gone. Once that’s done, wash and wipe down again to remove waste material.
Step 9: Dry Out And Reassemble
Set your blades aside on a clean towel and let them air dry to get rid of any moisture that’s left. While you wait for that, you may as well clean out your clipper, especially the compartment behind the blade. Your toothbrush will take care of that. Once that’s done and your blades are dry, remount your clipper blade.
Step 10: Oil Your Blades
Give your blades an oiling once they’re back on, as the process has stripped pretty much all the oil from the blades. For more on this, consult our guide on how to oil clippers. In short, put 2 or 3 drops spaced evenly across the blade, then run your clipper for a few seconds so that it spreads the oil.
Hints And Tips
How often you should sharpen your blades depends on your workload. Generally speaking, I recommend sharpening every six months. If you’re using your clippers around once a week, you can get by with sharpening once every year. If you’re using your clippers multiple times per day, as would be the case if you’re a barber or pet groomer, more often is better. Those with particularly heavy workloads may need to sharpen every two months.
Note that I’ve assumed you’re using a stainless steel blade. If you have a ceramic blade, the process is similar, but you’re going to need a different type of sharpening stone, since the typical stones don’t fare so well with ceramic blades. Ideally, you should get a diamond one. Pay close attention to the description of the sharpening stone you’re looking at. Don’t confuse a stone that’s made of ceramic with one that’s suitable for ceramic blades.
Always go from coarse to fine, especially if you’re using more than just one sharpening stone. Take the numbers from lowest to highest.
If you can’t find a sharpening stone, you can also use sandpaper. Again, you should have 3000 grit and 8000 grit, with grades in between if you want to get a finer blade. Everything works the same way.
Keep your blades flat against the sharpening stone. You can use a magnet to grip your blade if you’d rather not use your hands. You may have to go a bit slower to prevent the blade from falling off the magnet.
Conclusion
It takes a bit of work to sharpen your clippers, but it’s well worth the effort to maintain your clipper’s performance. The only significant expense here is the sharpening stone, and you can use that for more than just your clippers, since any blade can benefit from its use.
At the end of the day, learning how to sharpen hair clippers will save you a lot of hassle in the long run; so it’s a skill well worth having! Blunt blades can cause injury, so it’s important to keep your blades sharp.